
 |
 |
 |
 |
 |
You are not logged in. Would you like to login?

![]() Offline
Offline

on May 2, 2010, 9:35 pm, cecil671 wrote:
What type puller did you guys use to remove the outer bearing from the hub?
I got the old wheel studs removed as per Day's instructions,so now the bearing and redrill to ford lug pattern.
Everything I have is too thick in the jaw area to fit under the edge.
Thanks for the great advice so far.
Cecil.
![]() Offline
Offline

Daze wrote:
I supported the hub with two pieces of steel connected by... two bolts.
And then blocked it up in my press and pressed out the wheel flange.

![]() Offline
Offline

on May 3, 2010, 8:56 am, cecil671 wrote:
Good morning Day.
The bearing I need to remove is on the hub,right behind the flange that the wheel studs goue through.
There is only about 1/8" between the flange ant the bearing.
I will try to attach a pic so you can see the area.
Thanks,Cecil.

![]() Offline
Offline

on May 3, 2010, 9:58 am, Daze wrote:
Is this the picture you are trying to post?
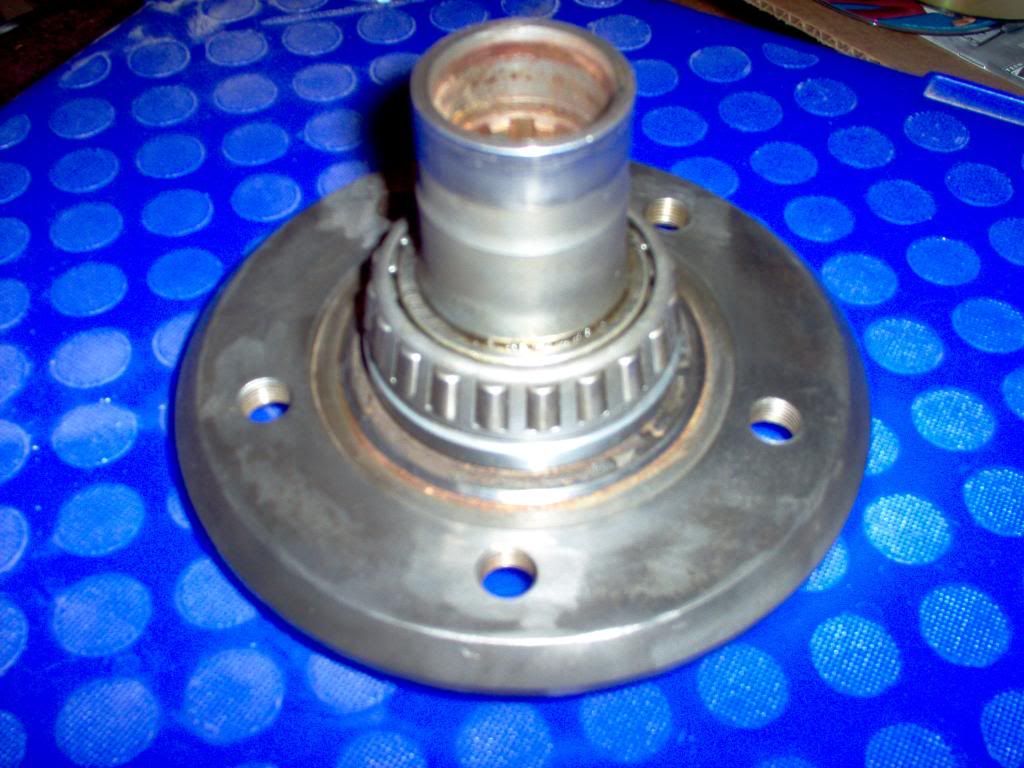
I was able to work my computer magic and use the info to find your album and then look through the pictures. In order to post pictures using your current album, you need to click on the picture you want to post in your album so you have a large view of it, then right click on the actual image so that a menu appears. select "copy image link" then past that link in to the"Optional Image URL:" box here on the forum.
Now to more important things I was able to get a screw driver between the hub and the seal pale and gently, VERY VERY gently pry the bearing and seal plate up enough to get a bearing separator like the one Joe pictured under it so that I could press it out. In fact if I remember correctly I had to position the bearing separator just barely grabbing, press a little bit and then reposition the separator to get a good bight under the plate. Let me know if I can help further.

![]() Offline
Offline

on May 3, 2010, 9:42 am, Joe wrote:
Here is a link to Harbor Freight Tools and something that I used. I would not recommend this
tool as a long term investment but it worked just fine for two hubs

![]() Offline
Offline

on May 5, 2010, 3:49 pm, farna wrote:
Yep, I have one of those now too! Probably not good for a shop that uses it many times a year, but good enough for occasional use (like a LOT of HR stuff...).
You're going to have some trouble drilling the hub for a Ford bolt pattern. There is a lip inside that fits inside a seal IIRC, that the new studs will overlap. I would think you could press the new studs in (or use threaded in studs and tap the holes, then stake with a punch to lock in place) then stick the hub in a lather and turn the edges of the new studs down to match that inside edge/lip/whatever you want to call it. I priced a set of hubs from CWI () drilled for 4.5"x5 bolt pattern (Ford/Chrysler/AMC) and found them a bit expensive, and that was why. I decided to use a dual pattern wheel instead. Need to buy an extra to use as a spare now -- will get a narrow one and fit it with a 15" VW Bug tire, a home brew compact spare. Right now if I get a flat on the rear I have to change a front tire out with my spare and use the previously front tire on the rear. I'll probably buy that extra wheel after I actually have to do that...

![]() Offline
Offline

on May 5, 2010, 3:54 pm, Daze wrote:
I redrilled mine using a 3 hole jig

Once I had the pattern drill I ground off one side of the studs and pressed them in to place.
I have a second IRS unit that will some day be going in my 62 Galaxie and for it I was able to find studs with a smaller head that should not need to be ground off.

![]() Offline
Offline

on May 5, 2010, 4:12 pm, farna wrote:
Good job! I can see that the stud just barely catches the side of the lip.

![]() Offline
Offline

on May 5, 2010, 4:26 pm, Daze wrote:
here is another picture with the wheel flange installed

I probably could have left the studs as is and still had enough clearance, but I figured it would be better to make sure I had plenty of clearance.

![]() Offline
Offline

on May 5, 2010, 6:25 pm, cecil671 wrote:
Mine had a thin circular sheetmetal shield that overlaped the heads of the studs and was fitted into a recessed groove arount the hub.
Did yours have them and you just didn't reinstall them?
Are they necessary to keep debris out of the seal?
Thanks.
Cecil

![]() Offline
Offline

on May 6, 2010, 12:25 pm, Joe wrote:
Cecil, my hubs had that same dust shield that you mentioned. They do come off but I spent hours trying to get them back on and was never able to succeed. Maybe someone else has as answer for us. If not I am prepared to go without.

![]() Offline
Offline

on May 7, 2010, 8:59 am, Daze wrote:
I have an answer for you ... well kind of ... not really I too spent hours trying to reinstall that ring, but could not get it on. I am sure it was originally installed by heating the ring, slipping it on to the catch machined in the hub and letting it cool, but I couldn't even get that to work. One of the nice things about the Jag rear is it was over engineered, in other words made way superior than it needed to be for its application. I feel that this metal ring is yet another one of those things and can be left off with out issue

![]() Offline
Offline

on May 6, 2010, 12:57 pm, Joe wrote:
The 3 hole jig is pure genius and it works really well. Making it however created a few challenges for me. My first attempt utilized empirical methods (trial and error) and I was pretty sure that it was correct but I just couldn't bring myself to start drilling the hub based on pretty sure. For my second attempt I used a piece of sheet metal approx 6" x 6" and scribed two circles, 4.5" and 4.75" diameters, with a common center. To do this I center punched a spot and then used the points on my micrometer to scribe the circle. From there I reset the micrometer to the dimensions noted below and scratched marks around the circles. Drill the holes and check for accuracy.
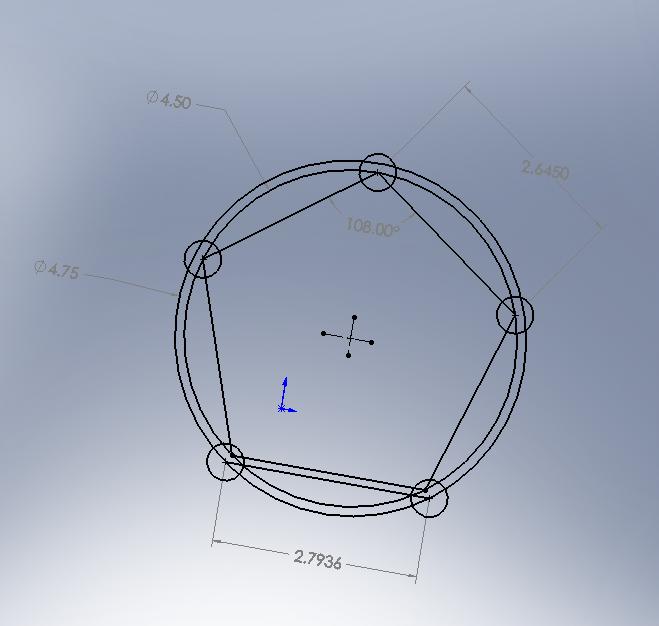
I used a drill press to drill the new holes. I got a great tip from a friend who is also a machinist. Take a piece of scrap metal that is smaller than the diameter of the hub and clamp it to the jaw of the vice. Put the hub in the vice so that it rides against the scrap piece, tighten the vice and locate your first hole. After you have drilled the hole, loosen the vice and rotate the hub making sure that it rides against the scrap piece. This ensures that every hole is drilled exactly on the same circle. If you have done everything accurately you should be able to rotate the hub directly under the drill bit and have it hit your mark exactly. I think I tested that assumption 5 or 6 times before actually drilling. I did both hubs and they came out perfect.

![]() Offline
Offline

on May 7, 2010, 8:44 am, Daze wrote:
When I first read:
"The 3 hole jig is pure genius and it works really well"
I was thinking to my self, even a blind squirrel finds a nut every now and again , but I must admit it was one of my better solutions to a problem.
When I made my jig, my "new pattern" pilot hole was perfectly in line with the 4.5" circle but was not perfectly centered between the two original holes. It was off by about a 64th but it didn't matter as all 5 holes were drill in the exact same spot relative to the original holes so I still ended up with a perfect pattern.
The rotating hub technique totally makes sense in getting all the holes on the same 4.5" circle, but how did you locate the holes in relationship to the original star pattern. in other words what did you use to space the holes on the 4.5" circle??

![]() Offline
Offline

on May 7, 2010, 5:34 pm, Joe wrote:
I used the 2.6450 dimension in the photo. Set my micrometer and lock it in and then scratched my way around the circle. Then I turned around and scratched the other direction creating a little x-mark on the circle. I knew I had it licked when the last mark crosses the first mark and there is no gap.

![]() Offline
Offline

on May 7, 2010, 6:52 pm, Daze wrote:
very slick!!!! That would give you a nice accurate pattern, I like it.
